
SPIN = Sistem Pengurusan Pengajaran dan Pembelajaran Interaktif
Selaras dengan pembangunan sains dan teknologi yang begitu pesat dalam era serba moden ini, penggunaan SPIN dalam sistem P&P telah mula diamalkan di UKM sejak kebelakangan ini. Penggunaan SPIN tidak susah. Pelajar hanya perlu memasukkan Pengenalan (no. kad matrik) & Kata Laluan masing-masing untuk log masuk ke dalam
Halaman khusus untuk diri kita.
Dalam halaman khusus diri kita, terpapar kesemua kursus yang didaftarkan oleh kita. Nota-nota dan tugasan kita yang diuploadkan oleh pensyarah kita boleh dimuat turun di SPIN. Tugasan yang telah kita siapkan juga boleh diuploadkan ke SPIN untuk semakan Pensyarah. Selain itu, segala berita terkini tentang kursus-kursus kita juga akan diuploadkan ke atas SPIN untuk makluman kita.
Secara ringkasnya, SPIN merupakan alat bantu mengajar yang berkesan dan dapat memudahkan proses P&P.
Monday, March 30, 2009
The use of ACCESS in monitoring students' database
Access is a useful tool to store students’ personal details, especially when there is a large number of student involved. Access enables us to do linking among students’ details, as well as to generate related report, create suitable forms and easy access for query.
We can create database in Access by following the steps below:
>Template categories>Featuring>New Blank Database>[enter file name]>Create
We are now being in a new database sheet. We first have to create a list of students’ personal details in a table in database. ID is automatically fixed for each student as their names are being keyed in to the database. We save the database right after all the information regarding students’ personal details are being keyed in. After keying in their personal details, we may need to key in their co-curriculum activities record. So, another new table needs to be created in the same database. To do so, we follow as below steps:
>Create>Table
Then we put in the co-curriculum activities record for each student. Still, their ID will not change, but to follow as per the 1st table build regarding personal details. The same steps are repeated for the building of another table for exam result.
So now, we have 3 tables containing students’ personal details, co-curriculum and exam result. How can we link the information together? Follow the steps below:
>Database tools>Relationships>Relationship Tools>design>Show table
Then we select those tables in database which consist those information of students’ which we wish to link them up. Then, we edit the relationships between each table to build up the relationship between the information needed. We wish to create a form containing all the information selected. The steps below followed:
>Create>Form Wizard
Then we select all the information we wish to be displayed in the form. Follow each step in the wizard and the form will be generated.
Almost all the steps are to be followed for the creation of query and reports.
Thursday, March 26, 2009
WebQuest creation
WebQuest is an online learning tool which can benefit the learners by guiding them to some specific sites, leading them to pick up useful information by providing clues in varieties tasks designed, thereafter evaluating learners based on the tasks completed by them. The objectives of Teaching and Learning process are considered to have been met if the learners are able to produce expected reflections in accordance to the aim/goals of the WebQuest.
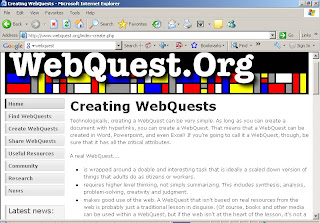
To set up a WebQuest (for trial purpose), we firstly need to set up an account. In www.webquest.org/index-create.php, we click on Create WebQuest.
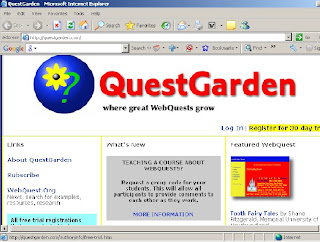
Then we will be led to QuestGarden. In QuestGarden, we select Register for 30 days trial.
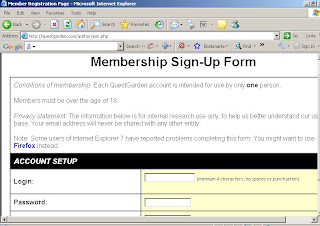
We will be in the page of Membership Sign –Up Form then.
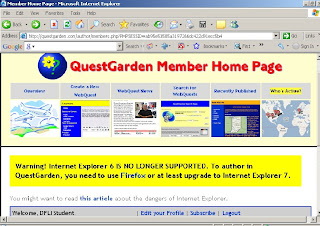
By answering all questions in the form & submit it, we will be directed to Quest Garden Member Home Page. In this page, we can read about the overview of WebQuest, we can search for WebQuest for our own reference, we can see the recently published WebQuest, we can edit our profile and so on.
Since we are interested in creating a new WebQuest, we click on Create a New WebQuest. We will be in our own WebQuest editing page now. There are a lot of different steps displayed, to guide us step-by-step on creating WebQuest.
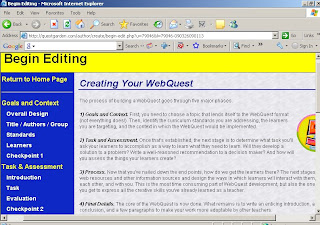
We were to brainstorm ourselves by referring to others WebQuest, get some rough ideas, there and then generate our own WebQuest topic. We have to decide carefully those contents to be inserted and the sequence of our ideas being presented to others. After that, follow every step in the Creating Your Webquest page to generate a brand new WebQuest topic.

To set up a WebQuest (for trial purpose), we firstly need to set up an account. In www.webquest.org/index-create.php, we click on Create WebQuest.
Then we will be led to QuestGarden. In QuestGarden, we select Register for 30 days trial.

We will be in the page of Membership Sign –Up Form then.

By answering all questions in the form & submit it, we will be directed to Quest Garden Member Home Page. In this page, we can read about the overview of WebQuest, we can search for WebQuest for our own reference, we can see the recently published WebQuest, we can edit our profile and so on.

Since we are interested in creating a new WebQuest, we click on Create a New WebQuest. We will be in our own WebQuest editing page now. There are a lot of different steps displayed, to guide us step-by-step on creating WebQuest.

We were to brainstorm ourselves by referring to others WebQuest, get some rough ideas, there and then generate our own WebQuest topic. We have to decide carefully those contents to be inserted and the sequence of our ideas being presented to others. After that, follow every step in the Creating Your Webquest page to generate a brand new WebQuest topic.
Tuesday, March 3, 2009
Create our personal Yahoo group
To get start with a new Yahoo group, we first have to get in to http://groups.yahoo.com.
We then have to click on “Start your group”.
Step 1: Select a Yahoo! Groups Category
A list of Group Categories is displayed for our selection. Since we have to create a personal Yahoo group for ourselves for assignments uploading purpose, we select “Schools & Education”. Under Schools & Education, we then choose “By Subject” as our sub category & “Place my group here” to define our personal Yahoo group under this category.
Step 2: Describe Your Group
We have to enter our group name which will appear on our group page and in search results. After that, we have to put in your group email address which, when we send a message to this address, all members of our group will receive a copy. Then, group description is required as well which will appear at the top of our group page.
Step 3: Select your Yahoo! Profile and Email Address
Our email address displayed here will receive group messages by email.
Our profile here will be used when other members want to learn more about us.
Last step, we have to gone through word verification to prevent automated registrations.
After going through all those steps shown above, our personal Yahoo group is considered as being created successfully.
We can see our group name, group home page & group email displayed.
Since we have created our personal Yahoo group, we have to invite our course mates & lecturers to join in to our group so that they can see our content inside (assignments, personal details etc)
To invite others to join our Yahoo group, we select “Invite People to Join”. After entering emails of those people we wish to invite, we click on “Submit invite”, and those who are invited will receive our email invitation then.
That’s all about creating a new Yahoo group & inviting others to join our groups.
Thereafter, we can actually upload our own assignments in our personal Yahoo group, so that the mainly DPLI yahoo group won’t be so congested.
Monday, March 2, 2009
Booklet & Brochure......
The next lesson, it is about the producing of Booklet & Brochure.
Booklet:
First, we have to set up the page margin. (Page Layout>Margins>Custom Margin>Pages>Book fold)
We will get a book fold style for editing, which we will get 2 pages of content in 1 page of A4 paper when it is printed out.
After the settings are done, we have to choose our content to be presented. After decided on the topic/content we wish to present, we start to search for the related information from books, newsletter, internet & all other media. It will be more attractive, if we can get some colorful pictures/diagrams to be added into our Booklet. Since we can have internet access as our assistance, we can simply copy those pictures/diagram we need from the internet to be inserted into our Booklet.
Brochure:
As for brochure, we have to set up different settings from Booklet.
We need to display our content into horizontal form. (Page Layout>Orientation>Landscape)
We need to make 1 page of A4 paper to become 3 folds. (Page Layout>Columns>three)
Then only, we start to put in our content into the brochure.
There is a small “trick” on editing the brochure. As the 1st column has to be the 2nd page of our content, the last column has to be the 1st page of content. It has to be organized so, so that when we print it out, we can get a 3-fold Brochure with all the contents laid perfectly arranged.
Just the same as the producing of Booklet, we need some tables/diagrams/pictures in our brochure, to make it attractive & interesting.
For both Booklet & Brochure, the main purpose is to present our topics in an effective, attractive & interesting way. Therefore, for both Booklet & Brochure, the contents have to be simple but compact, ideas have to be displayed in such ways that can attract readers.
For this assignment, I have done a topic on Healthy Lifestyle for Booklet, Mutation for brochure. Spent RM 9.80 just for color printing for both Booklet & brochure.
Huh…an expensive assignment.
Monday, February 16, 2009
Penggunaan Excel dalam P&P
Kuliah seterusnya...
Kuliah ini, kami belajar tentang pembinaan Excel untuk kegunaan dalam menganalisis keputusan peperiksaan.
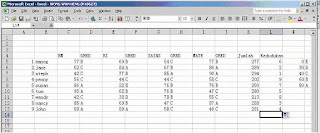
Pertama, kami membina jadual senarai nama 20 orang pelajar dengan markah peperiksaan untuk 4 mata pelajaran.
Kemudian, kami tentukan sela markah (range of marks) dengan grednya di jadual yang berlainan. Biar kami menamakannya sebagai jadual Gred.
Pada jadual Gred, kami perlu perlu 'define name' terlebih dahulu dengan memberi nama jadual sebagai 'Gred' (>Insert>Name>Define).
Kemudian, kami mengaitkan column Markah dengan jadual Gred. Bagaimana caranya? Ia seperti langkah-langkah berikut:
>highlight column pertama gred markah>Insert>Function>VLOOKUP>Lookup_value(=column pertama markah), Table_array(=gred), Col_index_number(=2), Range_lookup(true)>ok
Pada ketika ini, apa yang dipaparkan di column pertama gred ialah gred yang sepatutnya (bagi markah yang pertama) mengikut jadual gred berdasarkan sela markah yang dibina tadi.

Formula yang dibina itu ditarik menuju ke bawah sehingga melingkungi seluruh column gred markah, maka semua gred yang sepadan dengan markahnya akan dipaparkan.


Selepas mengira Jumlah markah setiap pelajar, kami cuba menyusun kedudukan pelajar-pelajar dalam kelas.Untuk buat ini, kami mesti define column Jumlah terlebih dahula (>Insert>Name>define name (=Jumlah))
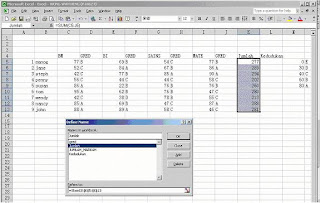
Pada column kedudukan pula, kami mengformatkannya dengan RANK (>Insert>Function>Rank(Number=Jumlah markah seseorang pelajar, Ref=Jumlah)

Hasilnya:
Seterusnya, kami binakan graf yang menunjukkan pencapaian pelajar dalam setiap mata pelajaran.
Kami kena bina satu jadual lagi untuk mengira jumlah pelajar yang mendapat setiap gred dalam setiap mata pelajaran, sebelum graf berkenaan dapat dihasilkan.
Caranya:
>Insert>Function>COUNTIF(Range=highlight seluruh column gred, Criteria=gred yang hendak dikira).


Kuliah ini, kami belajar tentang pembinaan Excel untuk kegunaan dalam menganalisis keputusan peperiksaan.
Pertama, kami membina jadual senarai nama 20 orang pelajar dengan markah peperiksaan untuk 4 mata pelajaran.
Kemudian, kami tentukan sela markah (range of marks) dengan grednya di jadual yang berlainan. Biar kami menamakannya sebagai jadual Gred.
Pada jadual Gred, kami perlu perlu 'define name' terlebih dahulu dengan memberi nama jadual sebagai 'Gred' (>Insert>Name>Define).
Kemudian, kami mengaitkan column Markah dengan jadual Gred. Bagaimana caranya? Ia seperti langkah-langkah berikut:
>highlight column pertama gred markah>Insert>Function>VLOOKUP>Lookup_value(=column pertama markah), Table_array(=gred), Col_index_number(=2), Range_lookup(true)>ok
Pada ketika ini, apa yang dipaparkan di column pertama gred ialah gred yang sepatutnya (bagi markah yang pertama) mengikut jadual gred berdasarkan sela markah yang dibina tadi.

Formula yang dibina itu ditarik menuju ke bawah sehingga melingkungi seluruh column gred markah, maka semua gred yang sepadan dengan markahnya akan dipaparkan.

Kami boleh mengira Jumlah markah setiap pelajar dengan highlight markah bagi kesemua mata pelajaran, kemudian tekan Autosum (>∑).

Selepas mengira Jumlah markah setiap pelajar, kami cuba menyusun kedudukan pelajar-pelajar dalam kelas.Untuk buat ini, kami mesti define column Jumlah terlebih dahula (>Insert>Name>define name (=Jumlah))

Pada column kedudukan pula, kami mengformatkannya dengan RANK (>Insert>Function>Rank(Number=Jumlah markah seseorang pelajar, Ref=Jumlah)

Hasilnya:

Seterusnya, kami binakan graf yang menunjukkan pencapaian pelajar dalam setiap mata pelajaran.
Kami kena bina satu jadual lagi untuk mengira jumlah pelajar yang mendapat setiap gred dalam setiap mata pelajaran, sebelum graf berkenaan dapat dihasilkan.
Caranya:
>Insert>Function>COUNTIF(Range=highlight seluruh column gred, Criteria=gred yang hendak dikira).

Begitu caranya jumlah pelajar bagi setiap gred dalam setiap mata pelajaran dirumuskan.
Selepas langkah ini, graf-graf boleh dihasilkan dengan menggunakan Chart Wizard.
Dalam Chart Wizard, kami memilih jenis chart yang ingin dibina. Selepas itu, semua data yang hendak dimasukkan ke dalam graf mesti dihighlightkan, diberi tajuk, nama paksi-X da paksi-Y.
Dengan itu, satu graf yang dilengkapi semua criteria yang dikehendaki akan terhasil.

Dengan itu, siaplah satu tugasan Excel minggu ini.
Terima kasih banyak-banyak kepada rakan-rakan yang sudi menghulurkan tangan semasa saya menghadapi masalah dapat menyiapkan tugasan ini.
Segala tunjuk ajar daripada anda dihargai amat.
Terima kasih banyak-banyak kepada rakan-rakan yang sudi menghulurkan tangan semasa saya menghadapi masalah dapat menyiapkan tugasan ini.
Segala tunjuk ajar daripada anda dihargai amat.
Monday, February 9, 2009
How to make a PowerPoint Presentation???
The 4th week of studies....
We were taught of the way to produce powerpoint in teaching.
We first have to design our master slide. Whatever pictures, logo etc we wish to be displayed in all the slides, have to be planned in master slide. (>view>Slide Master)
Afterthat, we close Slide Master and put in the main contents into master slide.
From each of the main content, we were to create hyperlinks for each sub-title, in order to bring out the details of the main content in other slides.
To create Hyperlink, we right click our mouse (>Hyperlink>Place in this documents>slide titles>slide _).
We then need to make the set up for the whole powerpoint so that after each slide of sub-title, we can back to the main master slide. (>Slide Show>Set Up Show)
Lastly, we put in all the contents for each sub-title.
Actually, we can make our powerpoint presentation more interesting by adding in some sound, animation, video clips etc.
To add in animation for example, we can choose the sequence & the ways to display our content (>Animations>Custom Animation>Add Effect).
Now, lets start the slide show for the viewing of the outcome!
Subscribe to:
Posts (Atom)
